Amazing PowerShell One-Liners for System Administrators
Here is a collection of some really cool PowerShell one-liners scripts. I find them very useful for day-to-day system administration tasks. I will keep adding to this list as I learn more useful commands.
List of all installed applications on a Windows device
This one-liner searches the Windows Registry to identify all installed 32-bit and 64-bit applications. It will display the version, publisher, and install date in a formatted table.
This one-liner will also list all installed Windows Updates files (KB)
Get-ItemProperty HKLM:\Software\Microsoft\Windows\CurrentVersion\Uninstall\*, HKLM:\Software\Wow6432Node\Microsoft\Windows\CurrentVersion\Uninstall\* | Select-Object DisplayName, DisplayVersion, Publisher, InstallDate | Sort-Object DisplayName | Format-Table –AutoSizePowershell Output

Here’s a breakdown of what each part of the command does:
Get-ItemProperty HKLM:\Software\Wow6432Node\Microsoft\Windows\CurrentVersion\Uninstall\*: This command fetches properties from the registry key where details of installed 32-bit applications are stored on a 64-bit system. This location is used by the Windows operating system to keep track of installed programs.| Select-Object DisplayName, DisplayVersion, Publisher, InstallDate: This pipes the results to theSelect-Objectcmdlet, which filters the properties to include only the display name, display version, publisher, and install date of the applications.| Format-Table –AutoSize: Finally, this pipes the selected properties to theFormat-Tablecmdlet with the-AutoSizeswitch, which formats the output as a table that adjusts column sizes to minimize truncation.
The result of this command is a table that lists the installed 32-bit applications on a 64-bit system, showing the display name, version, publisher, and installation date for each.
Note that you may need administrative privileges to run this command successfully, depending on the system’s permissions and User Account Control (UAC) settings. If you are querying 64-bit applications on a 64-bit system, you would use the path HKLM:\Software\Microsoft\Windows\CurrentVersion\Uninstall\* instead.
Get all installed KB numbers from Windows Update.
Similar to the first one-liner, this script will only return the installed KB patches on a Windows device.
Get-HotFix | Select-Object HotFixID, Description, InstalledOn | Sort-Object -Property InstalledOn -DescendingPowershell Output
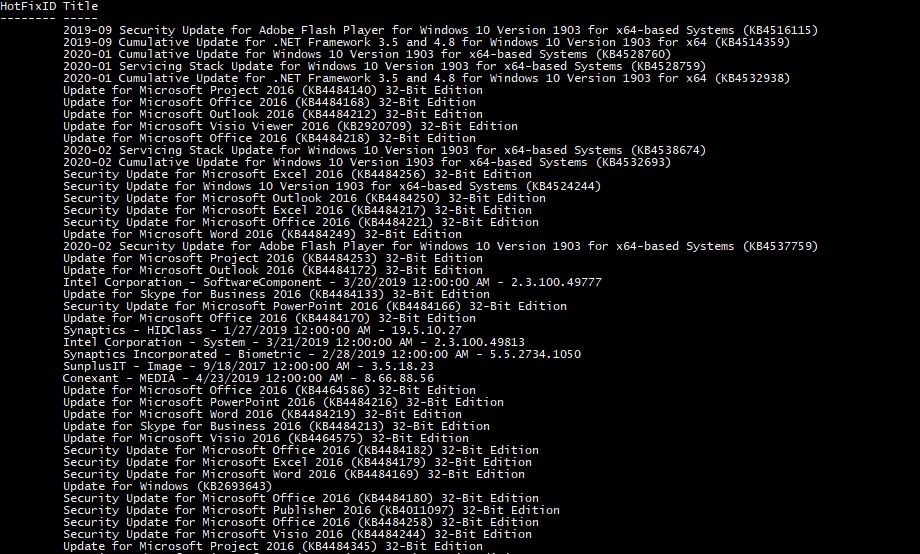
Here’s an overview of how the script works:
Get-HotFix: This cmdlet retrieves all installed hotfixes (including Windows Updates) on the local computer.| Select-Object HotFixID, Description, InstalledOn: Selects the KB number, its description, and the date it was installed.| Sort-Object -Property InstalledOn -Descending: Sorts the updates to show the most recently installed ones first.
Find Admin Shares on my computer
This great little oneline uses RegEx to find local admin shares.
Get-CimInstance -ClassName Win32_Share -Filter "Type=2147483648" | ForEach-Object { "\\$($_.PSComputerName)\$($_.Name)" }Powershell Output

Here’s a breakdown of the command:
Get-CimInstance -ClassName Win32_Share: Retrieves shared folders using the modern CIM method.-Filter "Type=2147483648": Filters specifically for administrative shares based on their type code.| ForEach-Object { "\\$($_.PSComputerName)\$($_.Name)" }: Constructs and displays the full UNC path for each administrative share found.
The result is a list of UNC paths for all shared folders on the local system.
Find Scheduled tasks that are running.
Useful if you want to know what a server tasks are
Get-ScheduledTask -State RunningPowershell Output

Here’s what each part does:
get-scheduledtask: This cmdlet retrieves all scheduled tasks on the local computer..where({$_.state -eq 'running'}): This method filters the tasks, selecting only those whoseStateproperty is equal to'running'.
So, if you run this command, you’ll get a list of all the scheduled tasks that are currently running on your system. It’s a handy way to quickly check what tasks are active at a given moment.
Find files
Find any file on a filesystem.
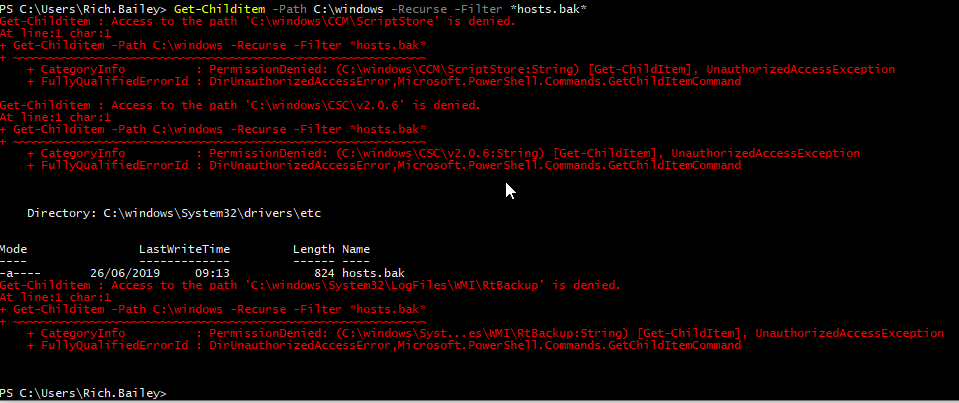
This script will look for the host.bak file in C:\Window, the account I have used does not have permission to view everything in C:\Windows, there i use -ErrorAction SilentlyContinue to make the output much easier to read
Get-ChildItem -Path C:\Windows -Recurse -Filter "hosts.bak" -ErrorAction SilentlyContinuePowershell Output

Output using SilentlyContinue
This script will recursively search the path C:\Temp for all filenames containing .log
Get-ChildItem -path C:\temp\ -Recurse -Filter .log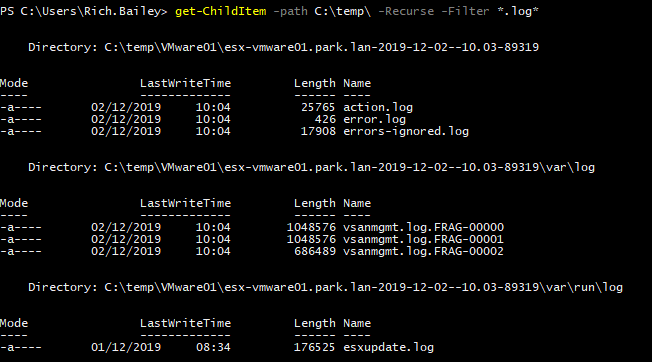
Here’s a breakdown of the command:
Get-ChildItem: The cmdlet used to get items (such as files and directories) at a specified location.-Path C:\windows: Specifies the path to start searching, in this case, theC:\windowsdirectory.-Recurse: Indicates that the search should include all subdirectories.-Filter hosts.bak: Specifies that only items with the namehosts.bakshould be returned.-ErrorAction SilentlyContinue: Specifies that if an error occurs (such as trying to access a directory where the current user does not have permission), the error message will be suppressed, and the command will continue executing.
This command can be useful for finding backup copies of the hosts file (named hosts.bak) within the Windows directory, perhaps after changes have been made. The results will include the full paths to any files found that match the filter criteria.
Please remember that the Windows directory often contains sensitive system files, and administrative privileges might be needed to access some subdirectories. If you’re running this command in a restricted user context, you may not be able to access certain paths, even with the -ErrorAction SilentlyContinue switch. In that case, running the command with elevated privileges might be necessary.
Find the Last Bootup Time
This is a really useful one-liner that can be run directly from the server, or you can run it against multiple servers
Get-CimInstance -ClassName Win32_OperatingSystem | Select-Object @{Name="LastBootUpTime"; Expression={$_.LastBootUpTime}}, PSComputerNameUse the property -computername to target other nodes
Get-CimInstance -ClassName Win32_OperatingSystem -ComputerName "Server01", "Server02" | Select-Object @{Name="LastBootUpTime"; Expression={$_.LastBootUpTime}}, PSComputerNamePowerShell output

]
Here’s a breakdown of what each part does:
Get-WmiObject win32_operatingsystem: This retrieves information about the operating system using thewin32_operatingsystemWMI class.| select: This pipes the results to theSelect-Objectcmdlet (aliased asselect), which allows you to select specific properties or computed properties.@{Name="Last Boot Time"; Expression={$_.ConvertToDateTime($_.LastBootUpTime)}}: This is a computed property that takes theLastBootUpTimeproperty (which is in a format that’s not human-readable) and converts it to a standard date/time format using theConvertToDateTimemethod. It then renames the property to “Last Boot Time.”PSComputerName: This selects the computer name property.
The resulting output will show the last boot-up time of the computer and its name in a clear and easy-to-read format.
Free Disk space information
This great little one-liner will give you the disk space of your local machine in a value and percentage. You can also pipe computer names to the one-liner to check multiple computers.
gwmi Win32_LogicalDisk -Filter "DeviceID='C:'" | Select Name, FileSystem,FreeSpace,BlockSize,Size | % {$_.BlockSize=(($_.FreeSpace)/($_.Size))*100;$_.FreeSpace=($_.FreeSpace/1GB);$_.Size=($_.Size/1GB);$_}| Format-Table Name, @{n='FS';e={$_.FileSystem}},@{n='Free, Gb';e={'{0:N2}'-f $_.FreeSpace}}, @{n='Free,%';e={'{0:N2}'-f $_.BlockSize}} -AutoSize
or you can use this:
Get-PSDrive -PSProvider filesystem | where-object {$_.used -gt 0} |select-Object -property Root,@{name="SizeGB";expression={($_.used+$_.free)/1GB -as [int]}}, @{name="UsedGB";expression={($_.used/1GB) -as [int]}}, @{name="FreeGB";expression={($_.free/1GB) -as [int]}}, @{name="PctFree";expression={[math]::round(($_.free/($_.used+$_.free))*100,2)}}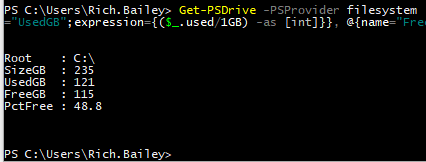
Here’s a breakdown of what each part does:
gwmi Win32_LogicalDisk -Filter "DeviceID='C:'": This retrieves information about the C: drive using theWin32_LogicalDiskWMI class.Select Name, FileSystem, FreeSpace, BlockSize, Size: This selects specific properties to work with.% {...}: Alias for theForEach-Objectcmdlet. It manipulates the properties, converting the free space and total size from bytes to GB, and calculating the percentage of free space.Format-Table ... -AutoSize: This formats the output as a table with custom column headers and automatically sizes the columns to fit the content.
The result is a neatly formatted table that shows the following information about the C: drive:
Name: The drive letter (C:).FS: The file system type (e.g., NTFS).Free, Gb: The free space in GB, formatted to two decimal places.Free,%: The percentage of free space, formatted to two decimal places.
It’s a clean and informative way to present key information about the C: drive’s usage, all in one line of PowerShell code!
Find out how big a folder is
This useful oneliner will tell you how big the temp folder is, including the biggest file, average size, and total size.
Get-ChildItem -Path C:\Scripts -File -Recurse -Force | Measure-Object -Property Length -Sum -Maximum -Average | Select-Object @{Name="Total Files";Expression={$_.Count}},@{Name="Largest File(MB)";Expression={"{0:F2}" -f ($_.Maximum/1MB)}},@{Name="Average Size(MB)";Expression={"{0:F2}" -f ($_.Average/1MB)}},@{Name="Total Size(MB)";Expression={"{0:F2}" -f ($_.Sum/1MB)}}
Here’s a breakdown of each part of the command:
dir -path C:\Scripts -file -recurse -force: This uses thediralias for theGet-ChildItemcmdlet to list all files (-file) in theC:\Scriptsdirectory and its subdirectories (-recurse). The-forceswitch includes hidden and system files.| measure-object length -sum -max -average: This pipes the results to theMeasure-Objectcmdlet, which calculates the sum, maximum, and average of thelengthproperty (file size) of the items.| Select-Object: This pipes the results toSelect-Object, which is used to create custom properties for the output object:Total Files: The count of files.Largest File(MB): The size of the largest file, formatted to two decimal places and converted to megabytes.Average Size(MB): The average file size, formatted to two decimal places and converted to megabytes.Total Size(MB): The total size of all files, formatted to two decimal places and converted to megabytes.
The resulting object will be printed to the console with the selected properties, providing a quick summary of the files in the specified directory. Make sure you have the necessary permissions to access the directory and files, especially since the -force switch will include files that might otherwise be inaccessible.
Active Directory Bulk Add Users
See the attached Video I uploaded to YouTube that goes into detail about bulk-adding AD-Users
This one-liner can require RSAT directory services installed locally or run on a Domain Controller.
I have also written a deep dive on PowerShell Active Directory. Check it out here
Find all users who have not logged in for the past 90 days, disable their accounts, and move them to an organizational unit (OU)
# Note: The LastLogonTimestamp is not replicated in real-time. It can be up to 14 days out of date by default.
$inactiveDays = 90
$targetOU = "OU=Disabled Users,DC=mydomain,DC=com"
$inactiveDate = (Get-Date).AddDays(-$inactiveDays)

Get-ADUser -Filter "Enabled -eq 'True' -and LastLogonDate -lt '$inactiveDate'" -Properties LastLogonDate | ForEach-Object {
    Write-Host "Disabling and moving user: $($_.SamAccountName)" -ForegroundColor Yellow
    # Uncomment the following lines to perform the actions
    # Disable-ADAccount -Identity $_.SamAccountName
    # Move-ADObject -Identity $_.DistinguishedName -TargetPath $targetOU
}
Here’s a breakdown of the script:
Get-ADUser -Filter {(Enabled -eq $True) -and (LastLogonDate -lt (Get-Date).AddDays(-90))}: This command searches for AD user accounts that are enabled and have aLastLogonDateolder than 90 days from the current date.ForEach-Object { Disable-ADAccount $_.SamAccountName; Move-ADObject $_.DistinguishedName -TargetPath "OU=Disabled Users,DC=mydomain,DC=com" }: For each user that matches the filter, the script does the following:Disable-ADAccount $_.SamAccountName: Disables the account by calling theDisable-ADAccountcmdlet with the user’s SamAccountName property.Move-ADObject $_.DistinguishedName -TargetPath "OU=Disabled Users,DC=mydomain,DC=com": Moves the user to the “Disabled Users” OU within the domain “mydomain.com”.
This command would typically be used by administrators to help manage inactive accounts in an Active Directory environment.
Keep in mind that this script can have significant impacts on user accounts, so it’s usually a good idea to test such scripts in a controlled environment before using them in production. Make sure you have the appropriate permissions to run these commands, and you may also want to add logging or confirmation prompts to ensure you have a record of the changes being made.
Note: The provided LDAP path "OU=Disabled Users,DC=mydomain,DC=com" should be adjusted to match your specific Active Directory structure. Make sure the target OU exists in your AD before running this command.
Extract all unique IP addresses from a log file and display the top 10 most frequently occurring ones.
Get-Content C:\MyLogFile.log | Select-String -Pattern "\d{1,3}\.\d{1,3}\.\d{1,3}\.\d{1,3}" -AllMatches | Select-Object -ExpandProperty Matches | Select-Object -ExpandProperty Value | Group-Object | Sort-Object -Property Count -Descending | Select-Object -First 10Here’s a step-by-step breakdown:
Get-Content C:\MyLogFile.log: Reads the content of the file located atC:\MyLogFile.log.Select-String -Pattern "\d{1,3}\.\d{1,3}\.\d{1,3}\.\d{1,3}": Searches the content for any pattern matching an IP address, using a regular expression (\d{1,3}\.\d{1,3}\.\d{1,3}\.\d{1,3}) that represents the four octets of an IP address.Select-Object -ExpandProperty Matches: Expands theMatchesproperty, which contains the matching values (IP addresses).Select-Object -ExpandProperty Value: Extracts the actual value of each match, i.e., the IP address.Sort-Object: Sorts the IP addresses. Note that this sort is lexicographic because it’s treating the IPs as strings, not as numerical values. This means that “10.0.0.2” will come before “2.0.0.2”.Get-Unique: Removes duplicate IP addresses, leaving only unique ones.Group-Object: Groups the unique IP addresses, counting how many times each one appears in the log file.Sort-Object -Property Count -Descending: Sorts the grouped objects by theCountproperty in descending order, so the most frequent IP addresses come first.Select-Object -First 10: Selects the first 10 objects, which represent the 10 most frequent IP addresses.
The result of this command will be a listing of the 10 most common IP addresses in the specified log file, along with the number of times each one appears.
Monitor a folder for changes and send an email notification whenever a new file is created.
$folder = "C:\MyFolder"
$watcher = New-Object System.IO.FileSystemWatcher
$watcher.Path = $folder
$watcher.IncludeSubdirectories = $false
$watcher.EnableRaisingEvents = $true
$action = {
    $body = "A new file has been created in $folder."
    $params = @{
        To = "[email protected]"
        From = "[email protected]"
        Subject = "New file in $folder"
        Body = $body
        SmtpServer = "smtp.yourdomain.com"
    }
    Send-MailMessage @params
}
$created = Register-ObjectEvent $watcher "Created" -Action $action
Here’s an explanation of each part of the script:
$folder = "C:\MyFolder": Specifies the folder to watch.$watcher = New-Object System.IO.FileSystemWatcher: Creates a new file system watcher object.$watcher.Path = $folder: Sets the path of the watcher to the folder specified earlier.$watcher.IncludeSubdirectories = $false: Specifies that the watcher should not include subdirectories in its monitoring.$watcher.EnableRaisingEvents = $true: Enables the watcher to raise events when changes occur in the specified path.$actionBlock: Defines a script block that will be executed when the “Created” event is triggered. Inside this block, an email is composed with information about the new file, and theSend-MailMessagecmdlet is used to send the email.$created = Register-ObjectEvent $watcher "Created" -Action $action: Registers the “Created” event with the file system watcher and specifies the action to take when the event occurs. This line actually starts the monitoring.
This script would be useful in scenarios where you need to keep track of changes to a specific directory and be notified when new files are created. Before running the script, make sure to update the email parameters, and also ensure that the necessary permissions and configurations are set up to send emails from the system where the script is running.
Please note that the script will continue running and monitoring the folder as long as the PowerShell session is open. If you need to stop the monitoring, you can use the Unregister-Event cmdlet with the event subscriber stored in the $created variable.
Create a report of all mailbox sizes in an Exchange server and export it to a CSV file.
Get-MailboxStatistics -Server "MyExchangeServer" | Select-Object DisplayName, TotalItemSize, ItemCount | Sort-Object TotalItemSize -Descending | Export-Csv -Path C:\MailboxReport.csv -NoTypeInformation
Here’s a detailed explanation:
Get-MailboxStatistics -Server "MyExchangeServer": This command retrieves mailbox statistics from the specified Exchange Server ("MyExchangeServer"). You would replace"MyExchangeServer"with the actual server name or IP address you’re targeting.| Select-Object DisplayName, TotalItemSize, ItemCount: This part of the command takes the results fromGet-MailboxStatisticsand selects specific properties to display: the display name of the mailbox, the total size of the mailbox, and the item count within the mailbox.| Sort-Object TotalItemSize -Descending: The results are then sorted by theTotalItemSizeproperty in descending order, so the largest mailboxes are listed first.| Export-Csv -Path C:\MailboxReport.csv -NoTypeInformation: Finally, the sorted and selected data is exported to a CSV file at the specified path (C:\MailboxReport.csv). The-NoTypeInformationswitch ensures that type information (which is typically not needed in the CSV output) is not included in the file. When executed, this command will produce a CSV file with details about the mailboxes on the specified Exchange Server, sorted by total size.
Monitor a website for availability and send an email notification whenever it goes down.
$url = "https://www.example.com"
$interval = 60 # seconds
while ($true) {
    try {
        Invoke-WebRequest -Uri $url -UseBasicParsing -TimeoutSec 30 | Out-Null
        Write-Host "$url is up."
    }
    catch {
        $body = "$url is down. Error message: $_."
        $params = @{
            To = "[email protected]"
            From = "[email protected]"
            Subject = "$url is down"
            Body = $body
            SmtpServer = "smtp.yourdomain.com"
        }
        Send-MailMessage @params
    }
    Start-Sleep -Seconds $interval
}
Here’s a step-by-step explanation:
- Variable Initialization:
$url: The URL you want to monitor.$interval: The number of seconds to wait between checks.
- Infinite Loop: The
while ($true)creates an infinite loop, which means this script will continue to run until it is manually stopped. - Website Monitoring:
Invoke-WebRequest: This command sends an HTTP request to the specified URL. The-UseBasicParsingswitch simplifies the parsing, and the-TimeoutSec 30specifies a 30-second timeout for the request.- If the request is successful,
"$url is up."is written to the host (console). - If the request fails (e.g., the website is down or the request times out), an email is sent with the error message.
- Email Notification:
- If an exception is caught (due to a failure in accessing the URL), an email is sent to the specified address with details of the error.
- Sleep:
Start-Sleep -Seconds $interval: This command pauses the script for the specified interval (in this case, 60 seconds) before the next iteration of the loop.
This script can be a handy way to keep track of the status of a particular website and get notified if something goes wrong. However, be cautious with the infinite loop and the email notifications, as they can lead to excessive emails if the site is having intermittent issues.
Find all the processes that are using a specific port.
Get-NetTCPConnection | Where-Object { $_.LocalPort -eq 80 } | Select-Object OwningProcess, RemoteAddress, RemotePort | Sort-Object OwningProcess | Get-Unique
Here’s a breakdown of the parts:
Get-NetTCPConnection: Retrieves active TCP connections.Where-Object { $_.LocalPort -eq 80 }: Filters the results to include only those connections where the local port is 80.Select-Object OwningProcess, RemoteAddress, RemotePort: Selects the properties that you want to display: the process ID that owns the connection, the remote address, and the remote port.Sort-Object OwningProcess: Sorts the results by theOwningProcessproperty (the process ID that owns the connection).Get-Unique: Ensures that only unique records are returned. However, this cmdlet works based on adjacent lines being the same, so it’s most effective when the sorted object is exactly the same from one line to the next.
The result will be a list of unique TCP connections on the local machine that are using port 80, along with information about the remote address and port and the process ID that owns each connection.
Create a script that retrieves the latest tweets from a list of Twitter users and sends an email notification:
$users = "user1", "user2", "user3"
$consumerKey = "yourConsumerKey"
$consumerSecret = "yourConsumerSecret"
$accessToken = "yourAccessToken"
$accessTokenSecret = "yourAccessTokenSecret"
$tweets = $users | ForEach-Object {
    $oauth = New-Object -TypeName 'LinqToTwitter.TwitterContext' -ArgumentList $authorizer
    $statuses = $oauth.Status.Where([LinqToTwitter.StatusExtensions]::UserIs($users)) | Select-Object -First 5 | Select-Object User, Text, CreatedAt
}
$body = $tweets | Format-Table -AutoSize | Out-String
$params = @{
    To = "[email protected]"
    From = "[email protected]"
    Subject = "Latest Tweets"
    Body = $body
    SmtpServer = "smtp.yourdomain.com"
}
Send-MailMessage @params
Here’s a breakdown of what each part does:
- Variables Initialization:
$usersis an array containing the usernames you want to fetch tweets for.$consumerKey,$consumerSecret,$accessToken, and$accessTokenSecretare placeholders for the OAuth credentials used to authenticate with the Twitter API. - Fetching Tweets: Inside the
ForEach-Objectloop, it seems like you are trying to create a new Twitter context using LinqToTwitter, and then fetch the tweets from the users. However, there are some issues in this part:- The variable
$authorizeris not defined in this script. Normally, this should be an object that contains the OAuth credentials, and you would create it using LinqToTwitter’sSingleUserAuthorizer. - The method
StatusExtensions::UserIsis not part of LinqToTwitter’s usual API. You might need to customize the query more appropriately to fetch the tweets for the specific user.
- The variable
- Formatting and Email Composition: The tweets are formatted into a table and converted to a string. An associative array
$paramsis defined to hold the parameters for the email, such as the To and From addresses, subject, body, and SMTP server. - Sending the Email: Finally,
Send-MailMessageis called with the parameters to send the email.
Thanks for taking the time to read this article. if you have any questions or feedback, please write in the comment section below.




Why not use “Get-HotFix” to get Installed KB?
That is a very valid point. I think when I original wrote this get-hotfix wasn’t a thing.