

How to create a complete test environment on the Google Cloud Platform using only gcloud
This article is to show you how powerful the GCP gcloud shell command prompt is. You can use it to create an entire environment without ever having to log into the GCP web console.
Here we will create a Load balanced compute engine cluster.
Create environments in cloud shell
First set your regions and zones in Cloud Shell or Cloud SDK. In this example we will be using US-CENTRAL1 and regions a and f.
export MY_REGION=us-central1
export MY_ZONE1=us-central1-a
export MY_ZONE2=us-central1-f
Create the Load Balancer
These commands will create a load balancer in your pre-defined regions (set above) and we will set the trigger to a pre-defined healthcheck called “webserver-healthcheck” – this is a check previously created.
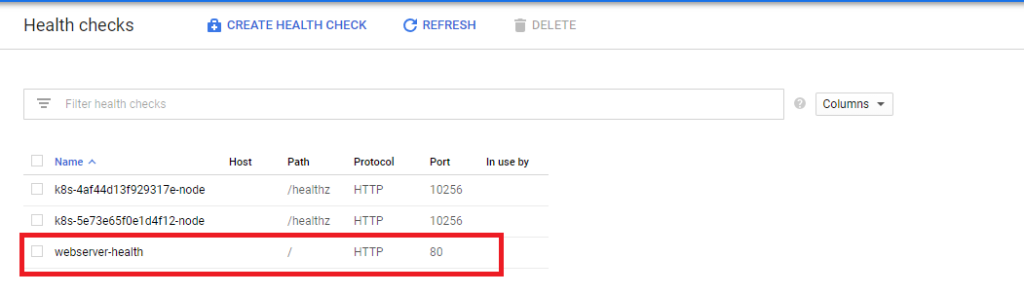
gcloud compute target-pools create extloadbalancer \
     --region $MY_REGION --http-health-check webserver-health
Next we will tell the loadbalancer to look for 3 webserver instances (we will create the instances later)
gcloud compute target-pools add-instances extloadbalancer \
     --instances webserver1,webserver2,webserver3 \
      --instances-zone=$MY_ZONE1
Next create a forwarding rule using the static IP address created on the load balancer. I have already reserved a static IP for test purposes.
gcloud compute addresses create ENTERNAME --region $MY_REGION

gcloud compute addresses list

export STATIC_EXTERNAL_IP=35.239.203.116
Now we need to asssign the static UP to the external load balancer
 gcloud compute forwarding-rules create webserver-rule \
     --region $MY_REGION --ports 80 \
     --address $STATIC_EXTERNAL_IP --target-pool extloadbalancer
How to build a VM in Cloud Shell
Launch 4 new servers:
- 2 in Zone 1
- 2 in Zone 2
gcloud compute instances create webserver1 \
     --image-family debian-9 \
     --image-project debian-cloud \
     --tags int-lb \
     --zone $MY_ZONE1 \
     --subnet default \
     --metadata startup-script-url="gs://cloud-training/archinfra/mystartupscript",my-server-id="WebServer-1"

gcloud compute instances create webserver2 \
     --image-family debian-9 \
     --image-project debian-cloud \
     --tags int-lb \
     --zone $MY_ZONE1 \
     --subnet default \
     --metadata startup-script-url="gs://cloud-training/archinfra/mystartupscript",my-server-id="WebServer-2"

gcloud compute instances create webserver4 \
     --image-family debian-9 \
     --image-project debian-cloud \
     --tags int-lb \
     --zone $MY_ZONE2 \
     --subnet default \
     --metadata startup-script-url="gs://cloud-training/archinfra/mystartupscript",my-server-id="WebServer-4"

gcloud compute instances create webserver5 \
     --image-family debian-9 \
     --image-project debian-cloud \
     --tags int-lb \
     --zone $MY_ZONE2 \
     --subnet default \
     --metadata startup-script-url="gs://cloud-training/archinfra/mystartupscript",my-server-id="WebServer-5"
Create an instance group for each zone and add the instances
gcloud compute instance-groups unmanaged create ig1 \
    --zone $MY_ZONE1
gcloud compute instance-groups unmanaged create ig2 \
    --zone $MY_ZONE2
Now add the VM instances to the instance group
gcloud compute instance-groups unmanaged create ig1 \
    --zone $MY_ZONE1

gcloud compute instance-groups unmanaged add-instances ig1 \
    --instances=webserver4,webserver5 --zone $MY_ZONE2
Configure the load balancer
Next you need to configure the load balancer to work with the newly created instance group.
How to configure healthcheck and created loadbalancer in GCP cloud shell
 gcloud compute health-checks create tcp my-tcp-health-check \
     --port 80
gcloud compute backend-services create my-int-lb \
--load-balancing-scheme internal \
--region $MY_REGION \
--health-checks my-tcp-health-check \
--protocol tcpgcloud compute backend-services add-backend my-int-lb \
--instance-group ig1 \
--instance-group-zone $MY_ZONE1 \
--region $MY_REGIONgcloud compute backend-services add-backend my-int-lb \
--instance-group ig2 \
--instance-group-zone $MY_ZONE2 \
--region $MY_REGIONgcloud compute forwarding-rules create my-int-lb-forwarding-rule \
--load-balancing-scheme internal \
--ports 80 \
--network default \
--subnet default \
--region $MY_REGION \
--backend-service my-int-lbHow to configure the firewall rules
Next we need to configure the firewall rules. By default, all ingress traffic is denied so new rules are needed to allow traffic
gcloud compute firewall-rules create allow-internal-lb \
     --network default \
     --source-ranges 0.0.0.0/0 \
     --target-tags int-lb \
     --allow tcp:80,tcp:443
gcloud compute firewall-rules create allow-health-check \
--network default \
--source-ranges 130.211.0.0/22,35.191.0.0/16 \
--target-tags int-lb \
--allow tcpgcloud compute instances create standalone-instance-1 \
--image-family debian-9 \
--image-project debian-cloud \
--zone $MY_ZONE1 \
--tags standalone \
--subnet defaultgcloud compute firewall-rules create allow-ssh-to-standalone \
--network default \
--target-tags standalone \
--allow tcp:22Now test connectivity usinhg this command
for ((i=1;i<=10;i++)); do curl $ILB_IP; doneNow confirm your external IP addresses. It may take some time for the addresses to generate.
gcloud compute addresses listUse the external IP address and create a STATIC_EXTERNAL_IP parameter
export STATIC_EXTERNAL_IP=[YOUR_STATIC_IP]Now you need to assign the external IP to the firewall rules
gcloud compute forwarding-rules create webserver-rule \
     --region $MY_REGION --ports 80 \
     --address $STATIC_EXTERNAL_IP --target-pool extloadbalancer
Now create the instance group and add the zones
Create an instance group for each zone and add the instances
gcloud compute instance-groups unmanaged create ig1 \
     --zone $MY_ZONE1
gcloud compute instance-groups unmanaged add-instances ig1 \
--instances=webserver2,webserver3 --zone $MY_ZONE1gcloud compute instance-groups unmanaged create ig2 \
--zone $MY_ZONE2gcloud compute instance-groups unmanaged add-instances ig2 \
--instances=webserver4,webserver5 --zone $MY_ZONE2Now we need to configure the Load Balancer again by adding a back end service.
 gcloud compute health-checks create tcp my-tcp-health-check \
     --port 80
gcloud compute backend-services create my-int-lb \
--load-balancing-scheme internal \
--region $MY_REGION \
--health-checks my-tcp-health-check \
--protocol tcpgcloud compute backend-services add-backend my-int-lb \
--instance-group ig1 \
--instance-group-zone $MY_ZONE1 \
--region $MY_REGIONgcloud compute backend-services add-backend my-int-lb \
--instance-group ig2 \
--instance-group-zone $MY_ZONE2 \
--region $MY_REGIONgcloud compute forwarding-rules create my-int-lb-forwarding-rule \
--load-balancing-scheme internal \
--ports 80 \
--network default \
--subnet default \
--region $MY_REGION \
--backend-service my-int-lbgcloud compute firewall-rules create allow-internal-lb \
--network default \
--source-ranges 0.0.0.0/0 \
--target-tags int-lb \
--allow tcp:80,tcp:443gcloud compute firewall-rules create allow-health-check \
--network default \
--source-ranges 130.211.0.0/22,35.191.0.0/16 \
--target-tags int-lb \
--allow tcpgcloud compute instances create standalone-instance-1 \
--image-family debian-9 \
--image-project debian-cloud \
--zone $MY_ZONE1 \
--tags standalone \
--subnet defaultgcloud compute firewall-rules create allow-ssh-to-standalone \
--network default \
--target-tags standalone \
--allow tcp:22You now have a fully autoscaling configuration which you can ssh too to test. If you use a tool like Apache BURN you can generate traffic to see the auto-scaling process in action