Unlock the Power of RDS Alerts: Enhance Your Database Monitoring with SNS on AWS
This procedure will walk through how to Configure RDS Alerts for DB in AWS using Event Subscriptions.
The goal of this procedure is to
Proactively establish event notifications in Amazon RDS via Amazon SNS topics, stream the data to Amazon Kinesis, and subsequently forward those notifications to Slack.
To Configure RDS Alerts requires a multi-step process.
Here’s a detailed step-by-step guide:
Step 1 – Setting Up Amazon RDS Alerts SNS Topics:
Sign in to the AWS Management Console:
- Open your preferred web browser.
- Navigate to the AWS Management Console at
https://aws.amazon.com/console/. - Enter your AWS account credentials (email or alias and password).
- If you have enabled multi-factor authentication (MFA), provide the necessary authentication code.
Navigate to the Amazon SNS Dashboard:
- Upon logging in, locate the “Services” dropdown menu in the top left corner of the console.
- In the search bar, type “SNS” or “Simple Notification Service” and select it from the dropdown list.
- This will take you to the Amazon SNS dashboard, where you can manage topics, subscriptions, and other SNS-related tasks.
Create a New SNS Topic:
- On the SNS dashboard, you’ll find a navigation pane on the left side. Click on the “Topics” option.
- This will display a list of existing topics (if any). To create a new topic, click on the orange
Create topicbutton.
Enter Topic Details:
- Name: Provide a unique name for your topic. This name will be used to identify the topic in the AWS ecosystem. Avoid using special characters or spaces.
- Display name: This is an optional field. The display name is used as the “From” field in emails sent by SNS. It’s a way to give a friendly name to your topic. Note that the display name is limited to 10 characters.
- Description (optional): You can provide a brief description of the topic’s purpose, which can be helpful for documentation or for other team members.
Advanced Settings (optional):
- You can configure additional settings like access policies, delivery retry policies, and logging. For most use cases, the default settings are sufficient. Nevertheless, if you have specific requirements, you can readily adjust these settings to suit your needs.
Finalize and Create Topic:
- After completing the required fields and configuring any advanced settings, click on the “Create topic” button at the bottom of the page.
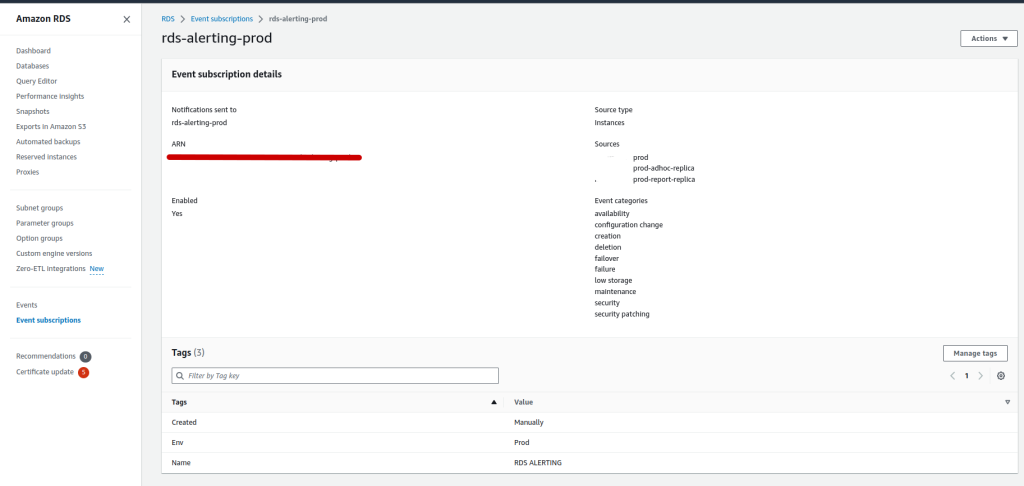
Step 2 – Configuring RDS Alerts Event Notifications:

Access the AWS Services Dropdown Menu:
- At the top left corner of the screen, you’ll notice a dropdown menu labeled “Services.” This menu contains a categorized list of all AWS services available to you.
- After successfully logging into the AWS Management Console, you’ll be presented with the main dashboard.

Search for Amazon SNS:
- Click on the “Services” dropdown to expand it.
- You’ll see a search bar at the top of the dropdown. Click into this search bar.
- Begin typing “SNS” or “Simple Notification Service.” As you type, AWS will provide auto-suggestions based on your input.
Select Amazon SNS from the List:
- From the auto-suggested results, locate “Simple Notification Service” or its abbreviation “SNS.”
- Click on it. This action will redirect you to the Amazon SNS dashboard.
Familiarize Yourself with the SNS Dashboard:
- Once on the Amazon SNS dashboard, take a moment to familiarize yourself with its layout.
- The left-hand navigation pane provides quick access to various SNS features such as
Topics,Subscriptions, andApplications. - The main area of the dashboard may display an overview of your SNS usage, including the number of topics you’ve created, the number of messages published, and any alarms or metrics if they’ve been set up.
Step 3 – Setting Up Amazon Kinesis Data Stream:
- Navigate to the Amazon Kinesis dashboard.
- Click on
Create data stream. - Name your stream and specify the number of shards.
- Click on
Create.
Integrating SNS with Kinesis:
- Go back to the SNS dashboard.
- Select the topic you created.
- Click on
Create subscription. - For the protocol, select
Kinesis. - For the
Kinesis stream, select the stream you created. - Click on
Create subscription.
Setting Up a Lambda Function to Send Data to Slack:
- Navigate to the AWS Lambda dashboard.
- Click on
Create function. - Name your function and choose a runtime (e.g., Python).
- In the function code, write a script to send the incoming data to your Slack channel. You’ll need to use Slack’s Incoming Webhooks for this.
- Save the function.
Integrating Kinesis with Lambda:
- In the Lambda dashboard, select the function you created.
- Under the
Designersection, click onAdd trigger. - Choose
Kinesis. - Select the Kinesis stream you created.
- Configure any additional settings as needed.
- Click on
Add.
Configuring Slack:
- Go to your Slack workspace.
- Navigate to
Apps & integrations. - Search for and select
Incoming WebHooks. - Click on
Add Configuration. - Choose a channel where the notifications will be posted.
- Click on
Add Incoming WebHooks integration. - Copy the Webhook URL provided.
Updating the Lambda Function with Slack Webhook URL:
- Go back to your Lambda function.
- Update the function code to include the Slack Webhook URL you copied.
- Save the function.
Now, whenever the specified events occur in your RDS instance or cluster, Amazon RDS will send notifications to the SNS topic. These notifications will then be streamed to Kinesis, which triggers the Lambda function to send the data to your Slack channel.


Recent Comments