
Control Your Atlas Data: Connect MongoDB with MongoSH Fast
Managing your MongoDB Atlas data shouldn’t be complicated. Whether you’re a developer needing to quickly query data or a system administrator performing maintenance, having a direct command-line interface (CLI) is invaluable. That’s where MongoSH comes in. This powerful tool allows you to interact with your MongoDB Atlas clusters directly from your terminal or command prompt, offering a fast and efficient way to control your data
Did you know its easy to connect to your MongoDB Database hosted on MongoDB Atlas using a CLI. Step up MongoSH, the easy way to manage MongoDB from the command line.
This article will show you how to install MongoSH on Linux and Windows. Then explain exactly how to connect to the database.
Why Use MongoSH?
- Direct Access: Bypasses GUI limitations for faster, more precise data management.
- Automation: Scripts and automates database tasks efficiently.
- Troubleshooting: Quickly diagnose and resolve database issues.
- Efficiency: Ideal for developers and administrators who prefer command-line tools.
Step1 – Installing mongosh:
Installing MongoSH on Linux is straightforward, thanks to the official MongoDB repositories. Here’s how to get started:
How to Install MongoSH on Linux (Ubuntu/Debian)
- Import the MongoDB GPG key:
This step verifies the authenticity of the MongoDB packages.
wget -qO - https://www.mongodb.org/static/pgp/server-7.0.asc | sudo apt-key add -- Create a list file for MongoDB
This adds the official MongoDB repository to your system’s package sources.
echo "deb [ arch=amd64,arm64 ] https://repo.mongodb.org/apt/ubuntu $(lsb_release -cs)/mongodb-org/7.0 multiverse" | sudo tee /etc/apt/sources.list.d/mongodb-org-7.0.list- Update package lists
This refreshes the package lists to include the new repository.
sudo apt update -y- Install
mongosh
This refreshes the package lists to include the new repository.
sudo apt-get install -y mongodb-mongoshWindows (MSI Installer):
For Windows users, installing MongoSH is made easy with the MSI installer:
Download the MSI Installer:
- “Visit the MongoDB Download Center: https://www.mongodb.com/try/download/shell“
- “Select Windows and download the MSI installer.”
Run the Installer:
- “Double-click the downloaded MSI file and follow the installation wizard.”
- “Crucially, ensure you add MongoSH to your PATH environment variable during installation. This allows you to run MongoSH from any command prompt.”
Verify Installation:
- “Open a new Command Prompt or PowerShell window and type
mongosh --version. If installed correctly, you’ll see the MongoSH version information.”

Step 2 – Connecting to MongoDB Atlas:
Now that MongoSH is installed, let’s connect to your MongoDB Atlas database.
- Get Your Connection String:
- Log in to your MongoDB Atlas account.
- Navigate to your cluster.
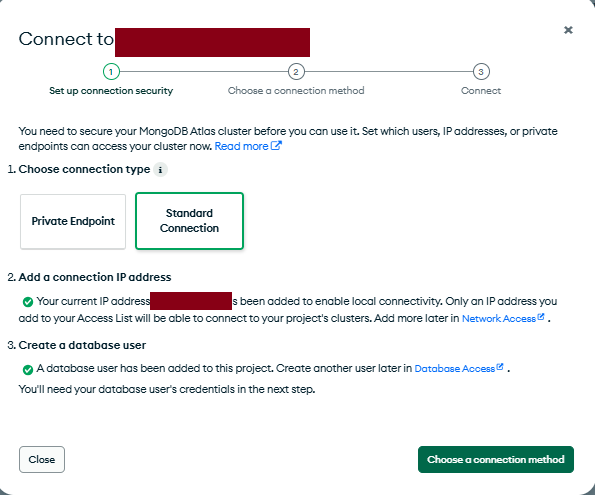
- Click the “Connect” button.
- Choose if you connect via a Private Endpoint or Standard Endpoint
- If you choose private endpoint you will most likely need VPN access into MongoDB
- If you use Standard Endpoint you will need to enable you IP Address from Security > Network Access page.
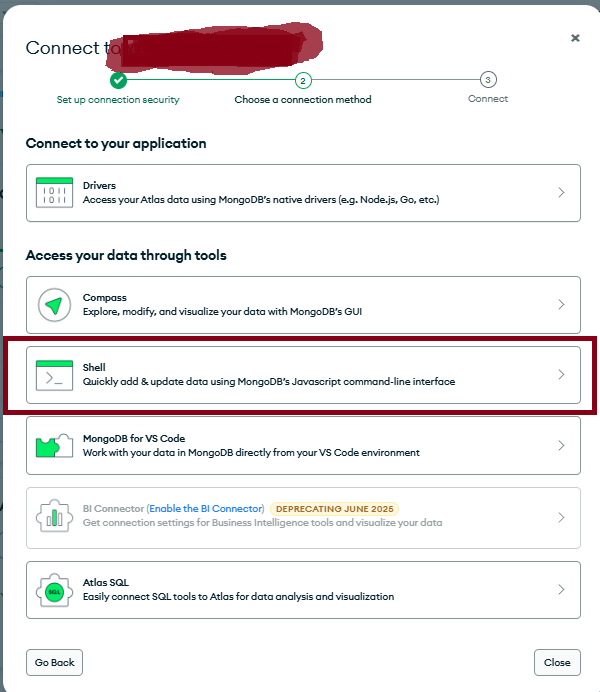
- Select “Connect with the MongoDB Shell”.
- Copy the connection string. It will look like this:
mongosh
mongosh "mongodb+srv://xfw-xxxxxxxxx-eu-prd.vltue.mongodb.net/" --apiVersion 1 --username rbailey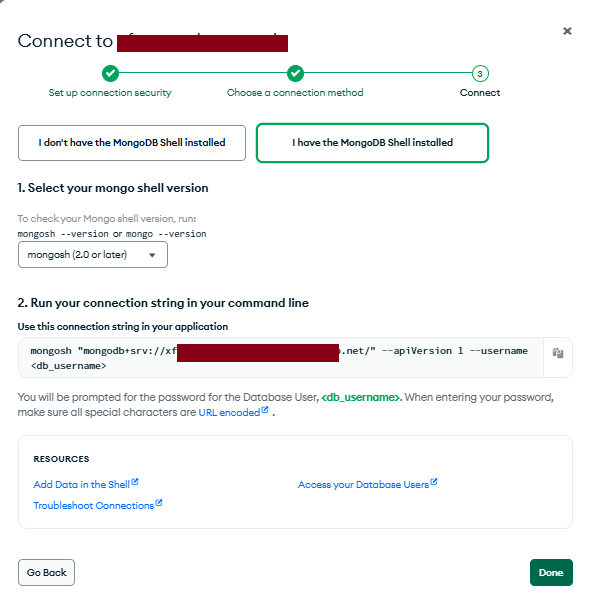
You will be prompted to enter your password after you press [ENTER]
- Connect Using
mongosh:- Open a terminal (Linux/macOS) or Command Prompt/PowerShell (Windows).
- Paste the connection string, replacing
<username>, mongosh “mongodb+srv://xfw-xxxxxxxxx-xxx-xxx.vltue.mongodb.net/” –apiVersion 1 –username rbailey - Press Enter.
- If you’re prompted for your password, enter it.
You should see something like this:
richard@UK-PF4WYXXA:~$ mongosh "mongodb+srv://xfw-xxxx.xxxxxxxx.mongodb.net/" --apiVersion 1 --username rbailey
Enter password: ****************
Current Mongosh Log ID: 111111111111111111111111111
Connecting to:          mongodb+srv://<credentials>@xfw-xxxxxxxxxxxxxx.mongodb.net/?appName=mongosh+2.0.0
Using MongoDB:          7.0.17 (API Version 1)
Using Mongosh:          2.0.0
mongosh 2.4.0 is available for download: https://www.mongodb.com/try/download/shell

For mongosh info see: https://docs.mongodb.com/mongodb-shell/

------
   The server generated these startup warnings when booting
   2025-02-25T22:25:51.277+00:00: /sys/kernel/mm/transparent_hugepage/enabled is 'always'. We suggest setting it to 'never' in this binary version
------

Atlas atlas-xxxxxxxxxxxxxxxxxxxxxxxxxxxxx-shard-0 [primary] test>
Common Errors and Troubleshooting
While connecting to MongoDB Atlas with MongoSH is generally straightforward, you might encounter a few common issues. Here’s how to troubleshoot them:
- Authentication failed or Incorrect password
- Cause: The most frequent issue is entering an incorrect password.
- Solution:
- Double-check your password for typos.
- If you’ve forgotten your password, reset it through the MongoDB Atlas web interface.
- Ensure you’re using the correct username associated with the Atlas cluster.
- If you have special characters in your password, ensure they are being interpreted correctly by your shell. Sometimes it helps to surround the password in quotes.
- Network timeout or Cannot reach server
- Cause: This usually indicates a network connectivity problem.
- Solution:
- Verify your internet connection.
- If you’re using a private endpoint, ensure your VPN is connected.
- Check the MongoDB Atlas status page to see if there are any service outages.
- If you’re using a Standard Endpoint, make sure your IP address is whitelisted in the Network Access section of your MongoDB Atlas cluster settings.
- Ensure that your firewall is not blocking the connection.
- command not found: mongosh
- Cause: MongoSH is not installed correctly or is not in your system’s PATH.
- Solution:
- Re-run the installation steps, ensuring you follow them precisely.
- For Windows, verify that you added MongoSH to your PATH environment variable during installation.
- For Linux, ensure the installation completed without errors. You might need to log out and back in to refresh your environment variables.
- Try to run the full path to the mongosh executable.
- Server selection timeout
- Cause: MongoSH cannot find a suitable server to connect to.
- Solution:
- Check your connection string for errors.
- Ensure your MongoDB Atlas cluster is running.
- If you’re connecting to a replica set, make sure at least one member is available.
- Check your network connection.
- API version mismatch
- Cause: The API version specified in your connection string is not compatible with the server.
- Solution:
- Try removing the
--apiVersion 1option from your connection string. - Ensure that your MongoSH version is compatible with your MongoDB Atlas server version.
- If needed, update your mongoSH to the newest version.
- Try removing the
- TLS handshake failed
- Cause: There is a problem with the SSL/TLS certificate.
- Solution:
- Ensure your system’s date and time are accurate.
- Check that your system trusts the certificate authority used by MongoDB Atlas.
- Verify that your connection string uses
mongodb+srv://(which enforces TLS).
Debugging Tips:
- Verbose Mode: Try running MongoSH with verbose output (e.g.,
mongosh --verbose) to get more detailed error messages. - Check Atlas Logs: MongoDB Atlas provides logs that can help you diagnose connection issues.
- MongoDB Documentation: Refer to the official MongoDB documentation for detailed troubleshooting guides.
If you continue to experience issues, consult the MongoDB community forums or contact MongoDB Atlas support for further assistance.

Recent Comments