
How to Create Multiple Active Directory users in PowerShell
This is one of the most common tasks system admins have to perform, create new user accounts in Active Directory. Adding one or two users is fine, but what happens when you need to add 1000 users, and you have a deadline of the end of today? Fear not! PowerShell has a great Import-CSV feature that takes the content from a CSV and imports it. System Admins can put in place a requirement for managers to ensure the spreadsheet is completed before onboarding new users.
This procedure will explain how to structure the CSV file. How to create a new user for every entry on the CSV. Saving you hours and the headache of having to do it manually. Ready? Lets go!
Step 1 – How to Format the CSV file.
A CSV file is a simple text file where data is organized in rows and columns, with commas separating each piece of information. It’s a versatile way to store and share tabular data between different software programs. PowerShell can read CSV files and use the data to complete tasks!
CSV Template (Core Information for AD User Accounts)
Here’s a CSV structure that captures the essential details needed to create new Active Directory user accounts. You can customize this further based on your specific requirements.
- Create a blank CSV in your favorite spreadsheet editor, for example, Microsoft Excel or Google Sheets
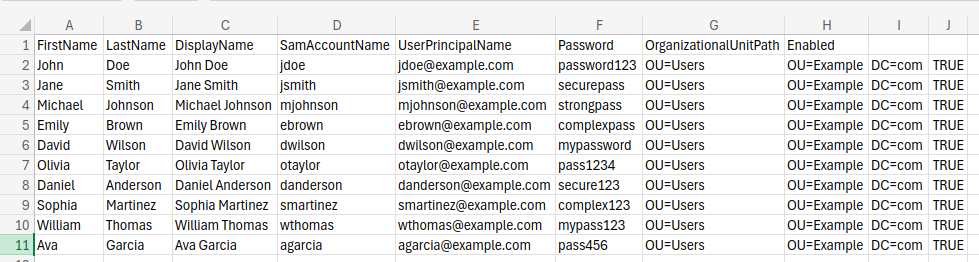
- Use the following headings in your CSV. Usually Line 1. Make sure each parameter is in its own column. (See picture for example)
FirstName,LastName,DisplayName,SamAccountName,UserPrincipalName,Password,OrganizationalUnitPath,EnabledHere is some example data.
FirstName,LastName,DisplayName,SamAccountName,UserPrincipalName,Password,OrganizationalUnitPath,Enabled
John,Doe,John Doe,jdoe,jdoe@example.com,password123,OU=Users,OU=Example,DC=com,TRUE
Jane,Smith,Jane Smith,jsmith,jsmith@example.com,securepass,OU=Users,OU=Example,DC=com,TRUE
Michael,Johnson,Michael Johnson,mjohnson,mjohnson@example.com,strongpass,OU=Users,OU=Example,DC=com,TRUE
Emily,Brown,Emily Brown,ebrown,ebrown@example.com,complexpass,OU=Users,OU=Example,DC=com,TRUE
David,Wilson,David Wilson,dwilson,dwilson@example.com,mypassword,OU=Users,OU=Example,DC=com,TRUE
Olivia,Taylor,Olivia Taylor,otaylor,otaylor@example.com,pass1234,OU=Users,OU=Example,DC=com,TRUE
Daniel,Anderson,Daniel Anderson,danderson,danderson@example.com,secure123,OU=Users,OU=Example,DC=com,TRUE
Sophia,Martinez,Sophia Martinez,smartinez,smartinez@example.com,complex123,OU=Users,OU=Example,DC=com,TRUE
William,Thomas,William Thomas,wthomas,wthomas@example.com,mypass123,OU=Users,OU=Example,DC=com,TRUE
Ava,Garcia,Ava Garcia,agarcia,agarcia@example.com,pass456,OU=Users,OU=Example,DC=com,TRUE
To get it to work, copy and paste the example data into Excel and use the Split Text to Column feature. Use “comma” as a Delimiter:
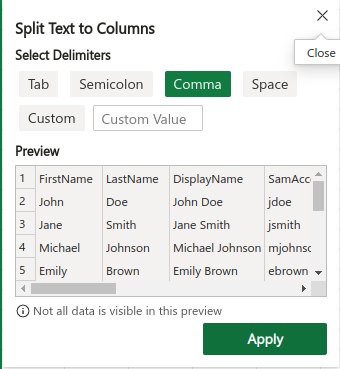
Picture Example:
Important Notes:
- Passwords: The passwords in this template are for demonstration purposes only. In a real-world scenario, NEVER use weak or easily guessable passwords. Always generate strong, unique passwords for each user and store them securely.
- Organizational Unit Path: Adjust the
OrganizationalUnitPathto match your Active Directory structure. - Data Variety: For more thorough testing, you might want to include additional variations in the data, such as:
- Different domain names in the
UserPrincipalName - A mix of enabled and disabled users (TRUE/FALSE in the
Enabledcolumn) - More complex
OrganizationalUnitPathstructures
- Different domain names in the
Remember: This template is designed to give you a starting point for testing. Adapt and expand it to suit your specific testing requirements.
Step 2 – Create PowerShell Script
Open PowerShell ISE as Administrator:
- Search for “PowerShell ISE” in your Start menu.
- Right-click on “Windows PowerShell ISE” and select “Run as administrator”.
Open the Script in PowerShell ISE:
- In PowerShell ISE, click on “File” -> “Open…”
- Navigate to the directory where you saved the PowerShell script and open it.
Step 3 – PowerShell Import-CSV Code for AD
Use this code. Ensure you read the notes in green and adapt to your local environment.
Import-Module ActiveDirectory

$csvFilePath = "C:\path\to\your\users.csv"  # Replace with the actual path to your CSV file

$users = Import-Csv $csvFilePath

foreach ($user in $users) {
    $newUserParams = @{
        Name                = $user.DisplayName
        GivenName           = $user.FirstName
        Surname             = $user.LastName
        SamAccountName       = $user.SamAccountName
        UserPrincipalName   = $user.UserPrincipalName
        Path                = $user.OrganizationalUnitPath
        AccountPassword     = ConvertTo-SecureString $user.Password -AsPlainText -Force
        Enabled             = [bool]$user.Enabled  # Convert string to boolean
    }

    try {
        New-ADUser @newUserParams
        Write-Host "User $($user.SamAccountName) created successfully!"
    }
    catch {
        Write-Error "Error creating user $($user.SamAccountName): $($_.Exception.Message)"
    }
}
Execute the Script:
- You have a couple of options to run the script:
- Run the Entire Script: Press the green “Run Script” button (or press F5) to execute the entire script at once.
- Run Selected Portions: Highlight specific lines or sections of code and press F8 to execute only the selected part. This can be useful for testing and debugging.
View Output and Errors:
- The output and any error messages will be displayed in the PowerShell ISE console pane at the bottom.

Recent Comments