

Key Takeaways
- Secure, Keyless Access:
execute-commandprovides secure shell access to ECS containers using AWS IAM permissions, completely eliminating the need to manage SSH keys or open ports. - Prerequisites are Essential: A successful connection requires the AWS CLI, the Session Manager plugin, and the
jqtool to be installed on your local machine. - IAM is in Control: All access is governed by your IAM Task Role and user permissions, ensuring that every session is authenticated, authorized, and can be logged via CloudTrail.
- One Command to Connect: The core of this method is the
aws ecs execute-command, which uses the Session Manager to establish an interactive shell session directly with your target container.
Why Use Execute Command Instead of Traditional SSH?
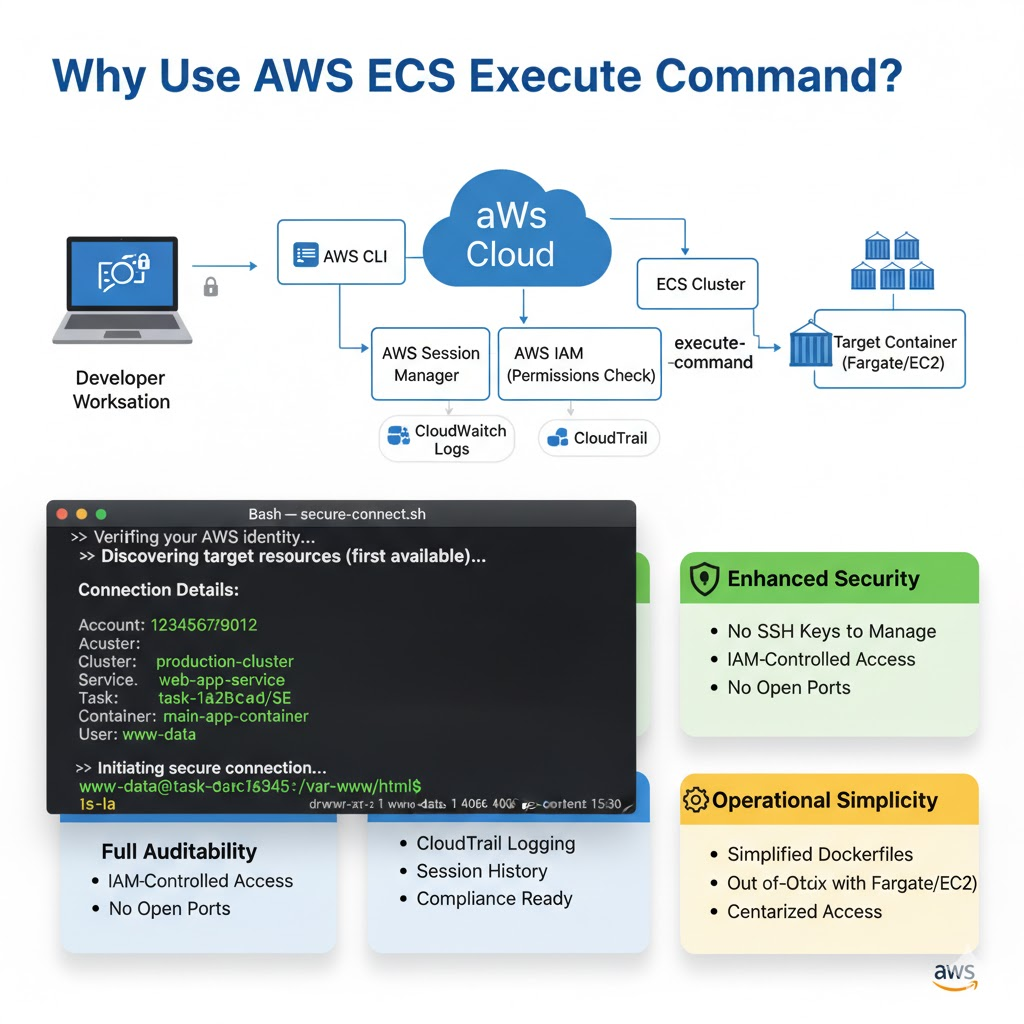
Before diving into the “how,” it’s crucial to understand the “why.” While setting up an SSH daemon inside a container is possible, the execute-command method is the modern, recommended approach for several key reasons:
- Superior Security: It removes the need to manage, distribute, and rotate SSH keys, which are common security risks. Access is controlled entirely through granular AWS Identity and Access Management (IAM) policies, which can be easily granted and revoked. Furthermore, you don’t need to expose any ports on your container, significantly reducing the attack surface.
- Full Auditability: Every
execute-commandsession can be logged in AWS CloudTrail. This provides a complete audit trail of who accessed which container, when they did it, and what commands they ran, which is essential for compliance and security monitoring. - Operational Simplicity: You no longer need to bake an SSH server into your container images, which simplifies your Dockerfiles and reduces image size. This method works out-of-the-box with any Fargate or EC2 launch type task, as long as the permissions are correctly configured.
This guide provides a secure method for gaining shell access to a running container in AWS ECS using the execute-command feature. This method relies on AWS IAM permissions and the AWS CLI, not traditional SSH keys.
What Prerequisites Are Needed to Use ECS Execute Command?
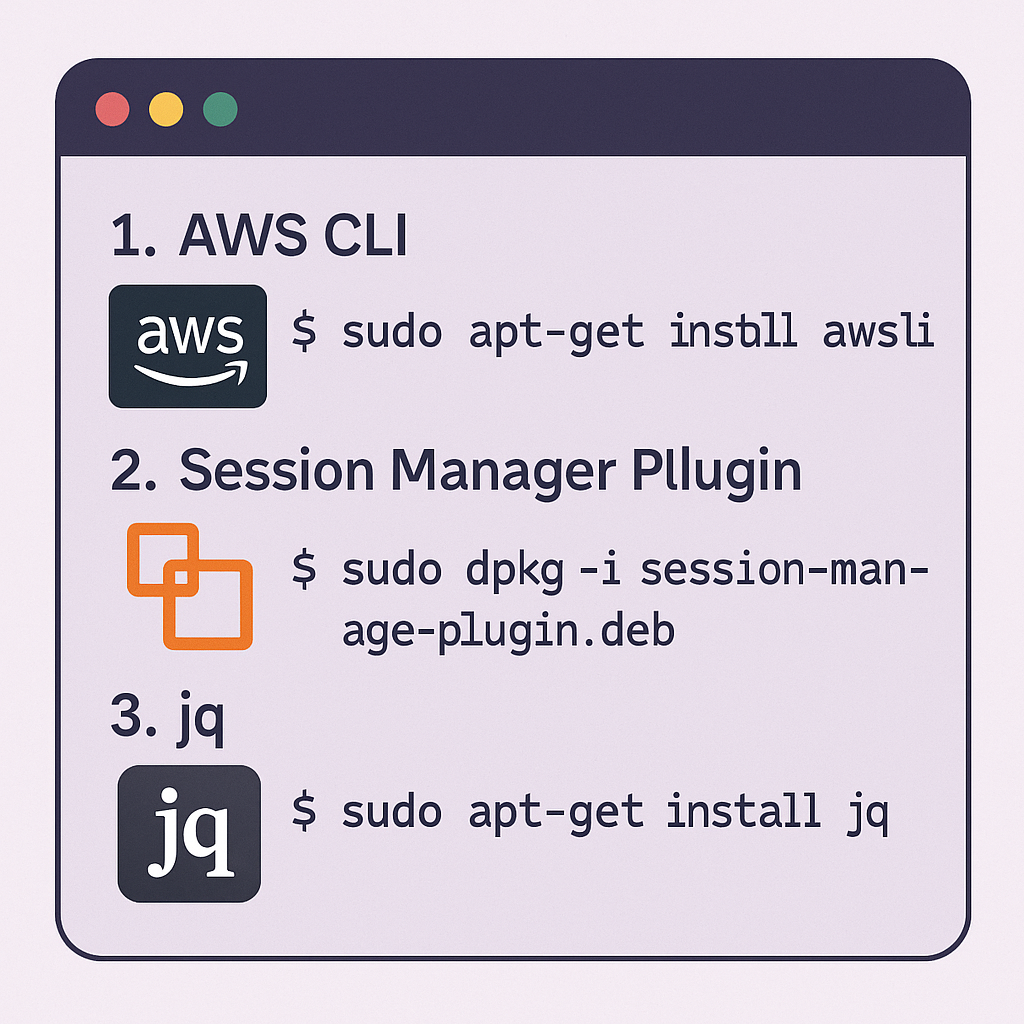
To begin, you must prepare your local environment by installing a few essential command-line tools. These tools work together to authenticate you with AWS and process the necessary information to establish a connection.
#1: AWS Command Line Interface (CLI)
The AWS CLI is the primary tool for interacting with AWS services from your terminal. This is what you will use to run the final command. Ensure the AWS CLI is installed and configured correctly on your Linux or macOS system.
#2: AWS Session Manager Plugin
This plugin is a critical component that works with the AWS CLI to run sessions. The execute-command feature uses the Session Manager service under the hood to create the secure tunnel to your container.
To install it on a Debian-based system like Ubuntu, use the following commands:
# Download the plugin package
curl "https://s3.amazonaws.com/session-manager-downloads/plugin/latest/ubuntu_64bit/session-manager-plugin.deb" -o "session-manager-plugin.deb"

# Install the package
sudo dpkg -i session-manager-plugin.deb
#3. The jq Command-Line Tool
jq is a lightweight and powerful command-line JSON processor. The connection script uses it to parse the output from AWS CLI commands to automatically find resource identifiers like your cluster and task ID.
Install jq with this command:
sudo apt-get install jq
How Do You Configure Your Local AWS Credentials?
Your terminal session must be authenticated with AWS and have the appropriate IAM permissions to interact with the ECS service. You can achieve this by logging in via AWS SSO, configuring a profile with aws configure, or exporting credentials as environment variables. The script below will automatically use your default configured credentials.
Here is a detailed step-by-step procedure to SSH onto an AWS container using AWS ECS Execute:
Step 1: Preparing Your Environment
Install Necessary Tools
Before you start, ensure that the following tools are installed in your system:
- AWS CLI: This is the command-line interface tool for interacting with AWS services.
- AWS Session Manager plugin: This plugin helps you to manage your AWS sessions more securely.
- JQ command-line tool: This is a lightweight and flexible command-line JSON processor.
Download and Install the AWS Session Manager Plugin
Use the following command to download and install the AWS Session Manager plugin. You can also use AWS-VAULT if you prefer.
curl "https://s3.amazonaws.com/session-manager-downloads/plugin/latest/ubuntu_64bit/session-manager-plugin.deb" -o "session-manager-plugin.deb"
sudo dpkg -i session-manager-plugin.debInstall the JQ Command Line Tool
Install the JQ command-line tool using the following command:
sudo apt-get install jqStep 2: Setting Up Access
Obtain AWS Access
Ensure that you have access to the Appropriate AWS Account role available in Single Sign-On (SSO).
I copy the programmatic AWS keys into my terminal for the account I want to access.
Step 3: Connecting to the AWS Container
Open Your Bash Terminal
Open your bash terminal and enter the following script to initiate the connection process:
#!/bin/bash

# --- Configuration ---
# Target AWS Account ID for safety check
ACCOUNT_ID_TARGET="<your-aws-account-id-here>"

# The name of the container to connect to, as defined in your Task Definition
CONTAINER_NAME="<your-container-name-here>"

# The user to run commands as inside the container
USER="www-data"

# (Optional) If you are not using the 'default' AWS profile, specify it here
# export AWS_PROFILE="<your-profile-name>"


# --- Script Body ---
echo "--> Verifying AWS credentials..."
ACCOUNT_ID_CURRENT=$(aws sts get-caller-identity | jq -r .Account)

if [[ "${ACCOUNT_ID_CURRENT}" != "${ACCOUNT_ID_TARGET}" ]]; then
  echo "[ERROR] Credentials mismatch! Expected account ${ACCOUNT_ID_TARGET} but found ${ACCOUNT_ID_CURRENT}."
  exit 1
fi

# --- WARNING ---
# This script automatically selects the FIRST cluster, service, and task found.
# This may not be the correct target in an environment with multiple resources.
echo "--> Finding target resources (first available)..."
CLUSTER_NAME=$(aws ecs list-clusters | jq -r '.clusterArns[0] | split("/")[-1]')
SERVICE_NAME=$(aws ecs list-services --cluster "${CLUSTER_NAME}" | jq -r '.serviceArns[0] | split("/")[-1]')
TASK_ID=$(aws ecs list-tasks --cluster "${CLUSTER_NAME}" --service "${SERVICE_NAME}" | jq -r '.taskArns[0] | split("/")[-1]')

# Check if any resources were found
if [[ -z "${CLUSTER_NAME}" || -z "${SERVICE_NAME}" || -z "${TASK_ID}" ]]; then
  echo "[ERROR] Could not automatically determine Cluster, Service, or Task ID. Please check your permissions and environment."
  exit 1
fi

echo ""
echo "Connection Details:"
echo "-------------------"
echo "  Account:   ${ACCOUNT_ID_CURRENT}"
echo "  Cluster:   ${CLUSTER_NAME}"
echo "  Service:   ${SERVICE_NAME}"
echo "  Task:      ${TASK_ID}"
echo "  Container: ${CONTAINER_NAME}"
echo "  User:      ${USER}"
echo "-------------------"
echo ""

echo "--> Initiating connection..."
aws ecs execute-command \
  --cluster "${CLUSTER_NAME}" \
  --task "${TASK_ID}" \
  --container "${CONTAINER_NAME}" \
  --interactive \
--command "runuser -u ${USER} -- bash"Verify AWS Account ID
Verify that the AWS account ID matches with your credentials using the following script:
ACCOUNT_ID=$(aws sts get-caller-identity | jq -r .Account)
if [[ "${ACCOUNT_ID}" != "my_aws_account_id" ]]
then
  echo "[error] Expected account my_aws_account_id but credentials are for account ${ACCOUNT_ID}"
  exit 1
fi
Set User Variable
Set the user variable to using the following script. In this example, my user is called www-data
USER=www-data
if [[ -z "${USER}" ]]
then
  USER="www-data"
fi
Retrieve AWS ECS Details
Retrieve details such as cluster name, service name, task ID, and container name using the following script:
CLUSTER_NAME=$(aws ecs list-clusters | jq -r '.clusterArns[0] | split("/")[-1]')
SERVICE_NAME=$(aws ecs list-services --cluster "${CLUSTER_NAME}" | jq -r '.serviceArns[0] | split("/")[-1]')
TASK_ID=$(aws ecs list-tasks --cluster "${CLUSTER_NAME}" --service "${SERVICE_NAME}" | jq -r '.taskArns[0] | split("/")[-1]')
CONTAINER_NAME="wordpress"
Display Retrieved Details
Display the retrieved details using the following script:
echo ""
echo "Account:   ${ACCOUNT_ID}"
echo "Cluster:   ${CLUSTER_NAME}"
echo "Service:   ${SERVICE_NAME}"
echo "Task:      ${TASK_ID}"
echo "Container: ${CONTAINER_NAME}"
echo "User:      ${USER}"
echo ""
Execute Command to Access the Container
Finally, execute the following command to access the container interactively:
aws ecs execute-command --cluster "${CLUSTER_NAME}" --task "${TASK_ID}" --container "${CONTAINER_NAME}" --interactive --command "runuser -u ${USER} -- bash"Step 4: Verification
Verify that you have successfully connected to the AWS container and can execute commands within the container environment.
Remember to replace "my_aws_account_id" with your actual AWS account ID in the script. This step-by-step procedure should guide you through SSHing onto an AWS container using AWS ECS Execute.
Leave a Reply